Popular Science Essay | The Enchantment of Light in Lenses—Unveiling the Science Behind the Starburst Effect in Photography
 03/12 2026
 680
680
The Enchantment of Light in Lenses
—Unveiling the Science Behind the Starburst Effect in Photography
Abstract/Introduction
Have you ever marveled at how streetlights at night transform into dazzling starbursts in photographs? This captivating effect isn't how the lights truly appear; rather, it's a magical phenomenon that occurs when light interacts with the camera's aperture, creating a unique interplay within the lens. This article will delve into the optical principles behind this effect from the perspective of light diffraction. You'll discover that the shape of the starburst and the number of rays are intricately linked to the lens aperture. We'll also provide practical tips to help you effortlessly capture stunning starbursts. Finally, we'll explore other fascinating phenomena created by light diffraction in photography. Let's decode the 'message' that light inscribes on our photos together.
I. Introduction: From Everyday Observations to Fundamental Questions: The 'Transformation' of Light Points
Imagine an ordinary night when you're standing atop a tall building, gazing down at a bustling street. To your eyes, the streetlights appear as bright yet indistinct points of light. However, when you raise your camera, adjust the settings, and narrow the lens aperture, the resulting photo surprises you: each streetlight now emits clear, linear starbursts, possibly with six, eight, or even more rays. Where do these 'rays' suddenly come from? Why do they only manifest in nighttime lighting? Why can't we see them directly with the naked eye, yet they are easily captured by a camera? What determines their shape and number? In the following article, we'll unravel the mysteries of starbursts together, guided by the principles of light's wave nature.

Comparison Image: Clear starbursts captured by a camera on the left, and indistinct light points captured with a large aperture on the right (Source: Pixabay)
II. The Cause of Starbursts: Aperture and Diffraction
In reality, starbursts are created by a camera component—the aperture. When light passes through the lens and into the aperture, the interaction between the aperture and light induces a diffraction phenomenon, resulting in bright starbursts on the film. First, let's clarify what an aperture is. Located within the camera lens, the aperture functions similarly to the pupil of the human eye, regulating the amount of light entering the camera by adjusting the size of its opening (aperture diameter), thereby controlling the brightness and clarity of the image. To achieve a variable aperture, the aperture is typically designed with several interlocking arc-shaped thin blades. By adjusting these blades, the camera can modify the aperture diameter, thus altering the amount of light that enters.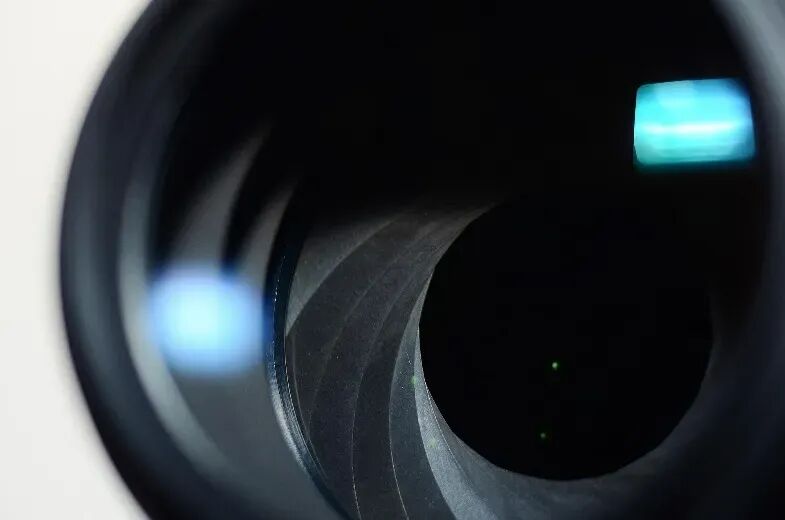
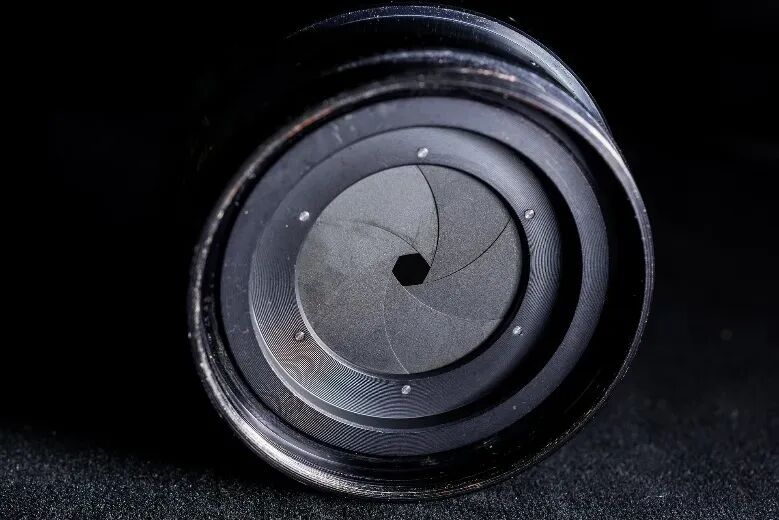
Comparison Image: Large aperture on the left, small aperture on the right (Source: Pixabay)
Upon closer inspection of the aperture, we notice that when the aperture is wide, its outline follows the curvature of the thin blades, resulting in a roughly circular shape. However, when the thin blades contract inward, reducing the aperture, the aperture no longer appears circular but becomes increasingly angular, roughly resembling a polygon. It is this characteristic of the aperture that creates different 'molds' for light diffraction, resulting in circular or starburst-shaped light spots. How does light diffraction occur? How are starbursts produced through this process? To explain light diffraction, we must first understand that light is actually a wave, and diffraction is a property shared by all waves. We can use water waves as an analogy: when water waves pass through an obstacle, diffraction occurs.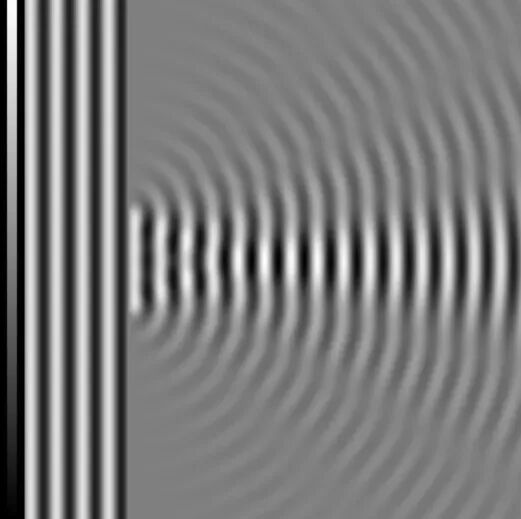
Comparison Image: Diffraction of water waves through a wide slit (left) and a narrow slit (right) (Source: Wikimedia Commons)
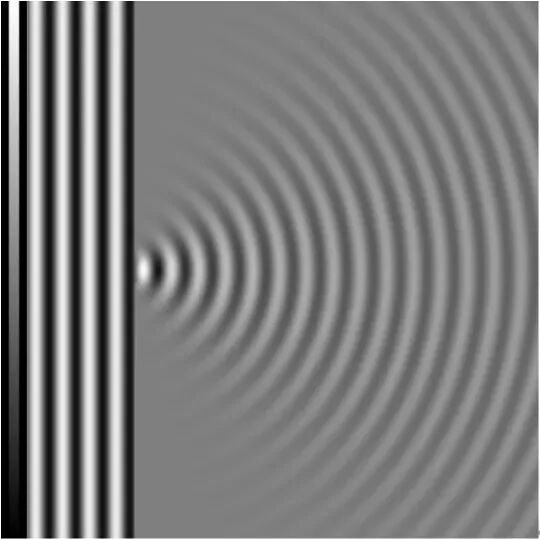
As depicted in the image above, when water waves encounter an obstacle, interesting phenomena unfold: if the gap in the obstacle is wide, most ripples pass through relatively straight. However, if the gap is narrow, roughly as wide as the wavelength of the ripples, the ripples that pass through are no longer a straight beam; they spread out again from each point on the gap, forming new, concentric small ripples. This phenomenon of 'water waves spreading out after passing through a small gap' is actually diffraction, and light diffraction behaves similarly. In layman's terms, light diffraction can be understood as 'constraining light causes it to spread out.' The greater the degree of constraint in one direction, the more the light spreads out in that direction. Therefore, when we constrain light with an extremely small slit, the light spreads out, undergoing diffraction, and leaves a diffraction pattern perpendicular to the slit direction on the diffraction screen behind it.
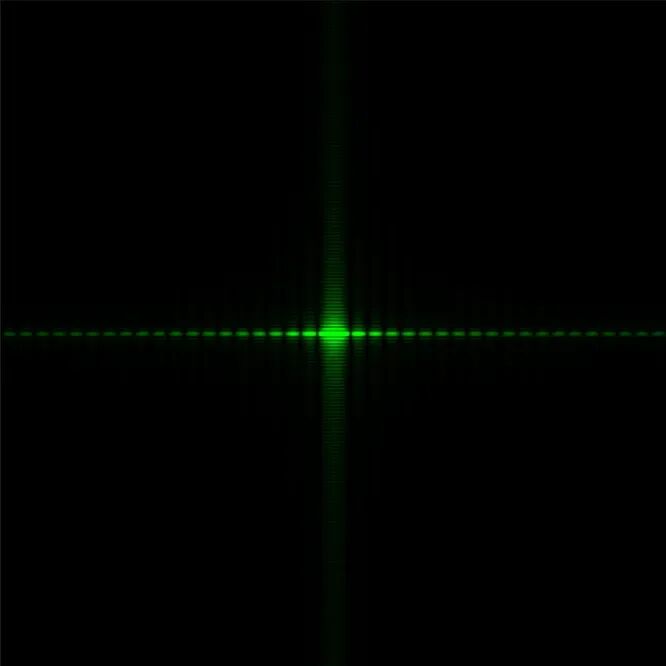
Single-slit diffraction aperture (left) and its simulated diffraction image (right)1
In the image above, we can observe that after light passes through the small slit on the left, because the slit is vertical, it constrains the light beam horizontally, resulting in horizontal spreading in its diffraction pattern. Of course, due to the interference of light waves, the actual diffraction pattern should consist of alternating bright and dark stripes. The reason why distinct stripes do not appear in starbursts is that the light sources we photograph in photography are relatively large, reducing the contrast of the stripes, leaving us with only a continuous light spot. Have you noticed that if we rotate such a diffracted light spot several times at a certain angle, allowing diffraction images to appear in multiple directions, it becomes exactly the sparkling 'starburst' we see in photos.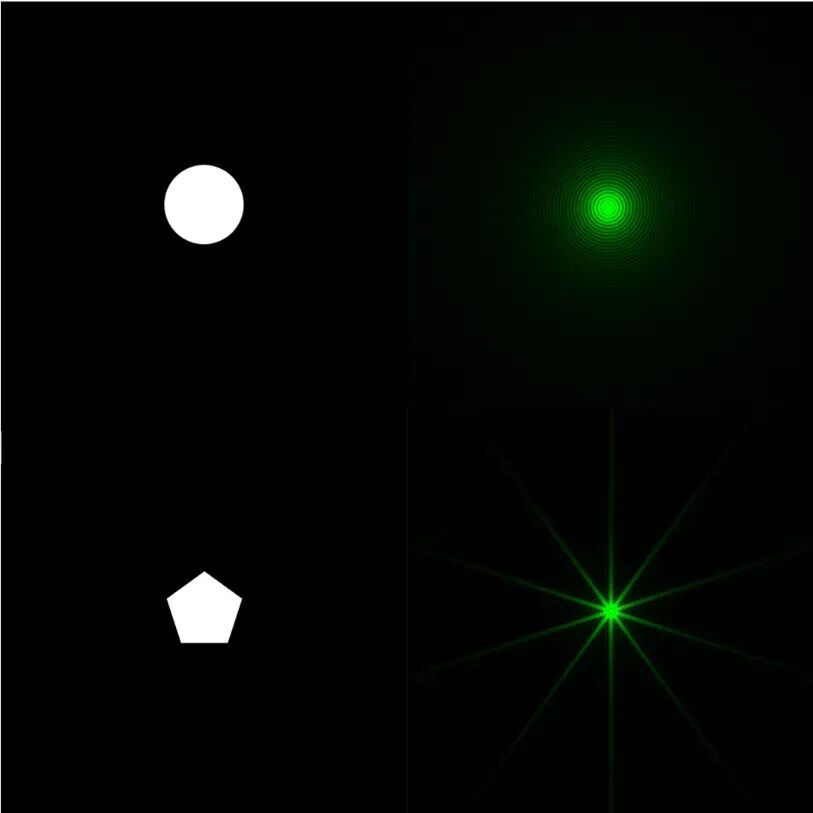
Comparison Image: Simulated diffraction pattern of a circular aperture (top) and a polygonal aperture (bottom)
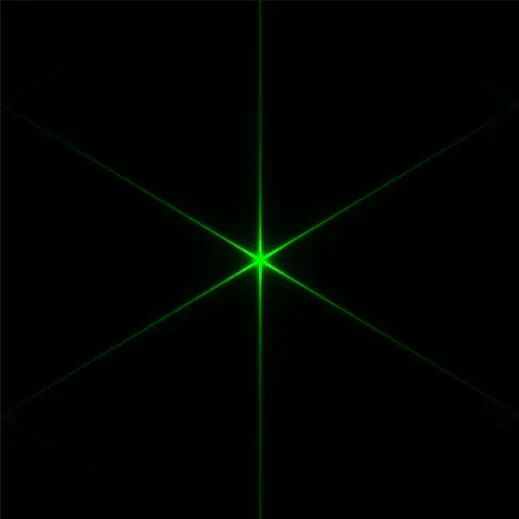
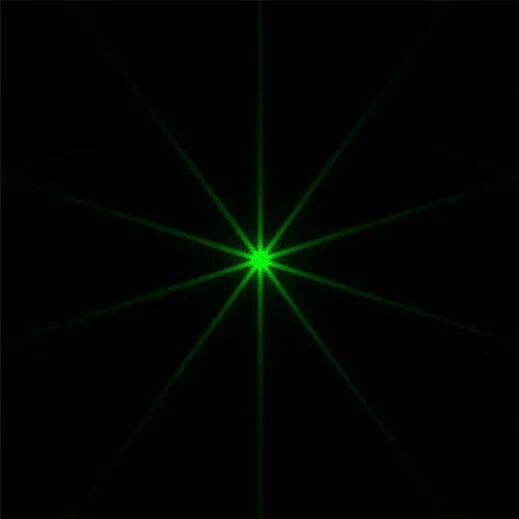
Now that we understand the aperture and light diffraction, it's not difficult to comprehend why light leaves beautiful starbursts on photos when passing through a small aperture: as shown in the image above, when the aperture is wide, the roughly circular aperture diffracts into a scattered circular light spot. When the aperture is narrow, the roughly polygonal aperture diffracts into 'rays' in multiple directions, resembling a star.
III. The Shape Code of Starbursts: The Relationship Between Aperture Blades and the Number of Rays
Now that we know starbursts originate from the diffraction of light passing through the aperture, the next core question arises: why do some photos have six-rayed starbursts, some eight-rayed, or even more? The 'decision-making power' over this number lies in the structure of the aperture blades. Let's return to the polygonal aperture formed by the blades. When the aperture contracts and becomes smaller, these blades no longer form a circle but a regular polygon. Each side of this polygon is equivalent to a tiny 'slit.' According to the diffraction principles we've learned, light passing through each such slit will produce a diffracted light spot extending perpendicular to the slit—this is a 'ray.' Therefore, a fundamental and core principle is that the number of starbursts largely depends on the number of sides of the polygon formed by the aperture blades. To help you understand this more intuitively, I've generated diffraction patterns for several different polygonal apertures using optical simulation software:


Different regular polygonal apertures (left) and their corresponding diffraction images (right)
By observing the diffraction images above, we can identify some patterns: 1. 'One-to-One Correspondence' for Even-Numbered Blades: Taking a rectangular aperture as an example, it has four sides, and in the final diffraction pattern, we also see four rays. In other words, n sides produce n rays. This rule generally holds for all apertures with an even number of blades. 2. 'Doubling' for Odd-Numbered Blades: However, when the number of blades is odd, the situation changes. Look at the diffraction pattern of a pentagon. Following the above logic, you might guess there are five rays. However, the simulated pattern clearly shows ten rays, meaning n sides correspond to 2n rays. In reality, each side should produce two symmetrical rays. In even-numbered polygons, because opposite sides are parallel, the diffraction patterns overlap, resulting in one pair of rays for every two sides. In polygons with an odd number of sides, each side's direction is different, so no overlapping occurs. Therefore, each side produces an independent pair of rays, leading to the 'doubling' of the number of rays. IV. Practical Magic for Capturing Starbursts: Tips for Photographers Now that we understand the scientific principles and patterns behind starbursts, we've uncovered some of their secrets. It's time to put this knowledge into practice and create these enchanting rays ourselves. In fact, you don't need highly advanced photography skills or expensive equipment; just remember a few key tips, and you can easily capture starbursts.
Tip 1: Stop Down the Aperture to Activate 'Starburst Mode'
This is the most crucial step in capturing starbursts. As we've mentioned, starbursts are the result of diffraction from a narrow aperture. Therefore, setting your camera's aperture to a smaller value is the primary condition for producing starbursts. Typically, set the aperture value between F/11 and F/16 or even smaller (e.g., F/22). The larger the F-number, the smaller the aperture diameter, and the starburst effect is usually more pronounced with finer, sharper lines. However, be aware that excessively stopping down the aperture (e.g., using F/22) can lead to a blurry image due to a wider diffraction effect. Therefore, it's advisable to find a balance between image quality and starburst effect within the F/11 to F/16 range. Feel free to take multiple shots at different aperture values in the same scene to observe the changes firsthand.
Tip 2: Find the Right Light Source—Point Light Sources
Having a narrow aperture isn't enough; you also need to find the right light source—point light sources. Not all light sources can form beautiful starbursts. Overly large light sources (e.g., a brightly lit building wall) will only become a blurry light spot. The best choices are, of course, nighttime streetlights, car headlights, decorative lights, etc. They are frequent subjects in photos and the most convenient light sources for capturing starbursts. Additionally, distant building windows or even the shimmering reflections on water surfaces are excellent point light sources. They are small, bright, and stand out prominently in the darkness, making them perfect for creating starbursts.
(Source: Pixabay)
Tip 3: Daytime Starburst—Using Obstacles to Create Point Light Sources
Starbursts are not exclusive to the night; during the day, we can also employ some clever techniques to capture unique radiance. The sun itself is an excellent point light source. You can look for times when the sun is farther away and brighter for shooting, but be particularly cautious as the sun's rays are extremely strong. Avoid using a large aperture and looking directly through the viewfinder. Additionally, when the sun's beams pass through the gaps in dense leaves, flowers, or other obstacles, these gaps become natural point light sources. Aim at these gaps, narrow the aperture, and you can capture stars twinkling in the sunlight as well. 
(Source: Pixabay)
Furthermore, pay attention to reflections on water surfaces, glass facades, metal surfaces, etc. These reflective spots are often small and bright enough to transform into starbursts when the aperture is narrowed. Mastering these techniques will make you a wizard of light, enabling you to actively shape and sculpt it rather than just passively record it. Whether it's the dazzling city nightscape or a casual ray of sunlight in daily life, they can all shine like stars under your lens. V. Other Diffraction-Related Phenomena in Photography After understanding the secrets of starbursts, you may find that the phenomenon of light diffraction is ubiquitous. It is like a rigorous yet creative artist, leaving various unique marks in the world of photography. Besides the charming starbursts, light diffraction also brings us other interesting visual effects, some of which photographers love, while others can be both loved and hated.
1. Annoying "Colorful Moiré"—The Emergence of Moiré Patterns
Have you ever found yourself in a scenario where, while photographing clothing with intricate stripes, building fences, or electronic screens, an unexpected layer of peculiar, multicolored wavy patterns emerges in the photo—patterns that are absent in the real world? This phenomenon is known as moiré, and it arises from the combined effects of diffraction and interference. To put it simply, when the texture pattern on the object being photographed (such as the fine stripes on clothing) closely matches the spatial frequency of the pixel array on the camera sensor, they interact to produce a new, visible beat pattern due to light interference. This is analogous to the phenomenon where, when two tuning forks with similar frequencies are sounded simultaneously, you perceive a "beat" that fluctuates in intensity. Here, the wave-like nature of light gives rise to this unique wavy effect. 
(Image Source: Pixabay)
2. The Curtain of Light—Lens Flare in Cameras
When shooting against the light, have you ever observed that, at times, a series of light spots or a hazy glow envelops the entire image? This is lens flare. Its occurrence is primarily due to the diffraction and reflection of light on the surfaces and within the lens elements.  (Image Source: Pixabay) Every camera lens comprises multiple lens elements. When intense light enters the lens at a specific angle, it reflects at the interface between the lens elements and air. These reflected lights bounce around multiple times inside the lens barrel, and eventually, a fraction reaches the sensor, forming those enigmatic light spots. The shapes of these light spots often mirror the shape of the aperture—this is precisely because light diffracts as it passes through the aperture. The phenomenon of multiple starbursts emanating from the same light source that we observe in photographs is also largely attributed to lens flare. Photographers typically employ lens hoods to mitigate unwanted lens flare; however, just the right amount of flare can imbue the image with a dreamy ambiance, filling the photograph with a sense of poetry and narrative. Through these phenomena, we can gain a deeper appreciation for the wave-like nature of light. It can produce aesthetically pleasing effects, such as starbursts, under specific conditions, but it can also lead to situations that require control, such as moiré, lens flare, or compromised image quality. Grasping the principles underlying these phenomena enables us to transcend passive recording and more proactively employ techniques to realize our creative visions. The next time you observe these visual effects brought about by optical principles in the viewfinder, I hope you can discern their causes with clarity and confidently manipulate your shooting outcomes.
VI. Conclusion
After perusing the aforementioned explanations, you may discover that the captivating starburst effects in cameras are, in fact, grounded in a straightforward physical law: when light passes through a narrow aperture or grazes past an edge, it naturally "spreads out." We can succinctly encapsulate this phenomenon with the phrase—"Light is a wave." This revelation unveils an intriguing fact: numerous seemingly magical phenomena in our surroundings often adhere to specific, definable scientific laws. For instance, starbursts are not the result of magic; they are simply a phenomenon that occurs when light traverses the small, regular polygonal aperture in a camera, adhering to physical principles. The wave-like nature of light, in conjunction with the specific shape of the aperture, gives rise to the enchanting starbursts in photographs. Comprehending this may alter our perspective on the world. It makes us recognize that a multitude of distinct visual phenomena, such as the iridescent oil slicks on water surfaces or the shifting hues on CD discs, are, in essence, manifestations of the wave-like nature of light, akin to starbursts. Behind them all lies the same fundamental physical principle at work.
I hope this exploration of starbursts will afford you an additional layer of insightful enjoyment the next time you encounter similar intriguing phenomena—knowing that beneath that beauty resides a scientific narrative that you can comprehend.
References
[1] Chen Min. Optics [M]. Beijing: Higher Education Press. 2024
[2] Zhao Kaihua. New Concept Physics Tutorial—Optics [M]. Beijing: Higher Education Press. 2004. 
-
![]()
ByteDance, DJI, and Xiaohongshu Secure Top Three Positions Among China’s Fastest-Growing Unicorns
-
Tesla's in-car voice system in China is finally learning to 'understand human language'
-
![]()
Foreigners Are Amazed: Chinese Electric Vehicle Drive Systems Unveil Innovative 'Poses'
-
![]()
700,000 Brothers and the Future of Robots: Behind JD.com's 'Nirvana Plan'
-
![]()
Zhipu's Trillion-Dollar Valuation: A New Chapter for China's AI
-
![]()
Is Laifen, a 'Dyson Alternative' on the Rise, Now Ensnared by the 'Alternative Curse'?
-
![]()
Beyond Patents: Insta360 and DJI Compete in Retail
-
![]()
Piercing Through Industry Chaos: The Curtain Rises on Compliance for Autonomous Driving